Managing Your Invoices
This is the central hub for viewing all your invoices.
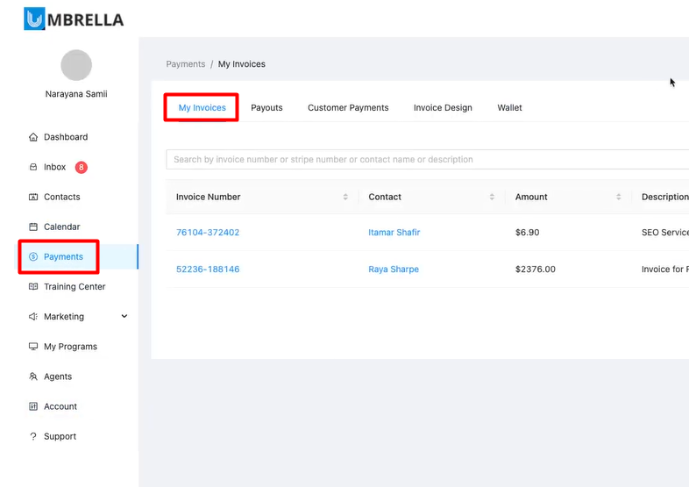
Access the Invoice List:
Click on Payments in the left-hand menu. It defaults to the My Invoices tab.
Understanding the Invoice List: The table displays key information:
Invoice Number: A unique identifier for each invoice within Umbrella.
Contact: The name of the customer the invoice was sent to. Clicking the name links to their contact profile.
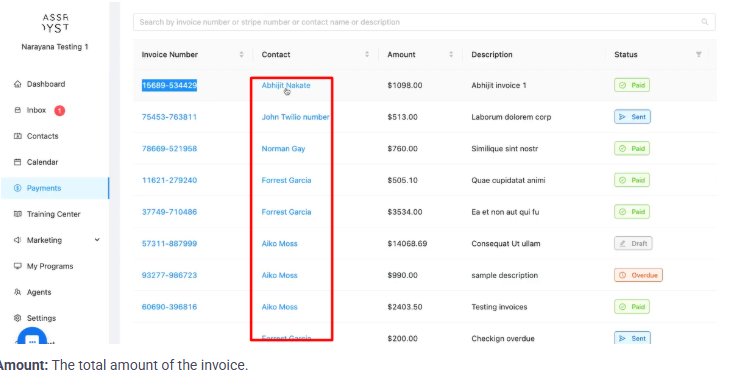
Amount: The total amount of the invoice.
Description: A brief description entered when creating the invoice.
Status: The current state of the invoice (see below).
Due Date: The date payment is expected.
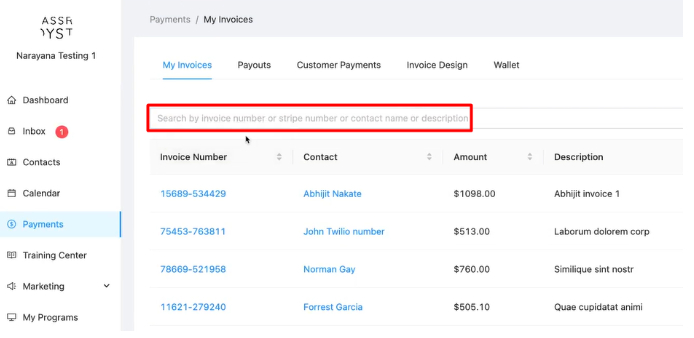
Searching for Invoices:
Use the search bar above the list to find invoices by:
Umbrella Invoice Number
Stripe Invoice Number (if applicable)
Contact Name
Description text
Invoice Statuses: Understand what each status means:
Draft: The invoice has been created but not yet finalized or sent.
Sent: The invoice has been finalized and sent to the customer (or the payment link generated).
Paid: The customer has successfully paid the invoice.
Overdue: The due date has passed, and the invoice has not been paid.
Creating a New Invoice:
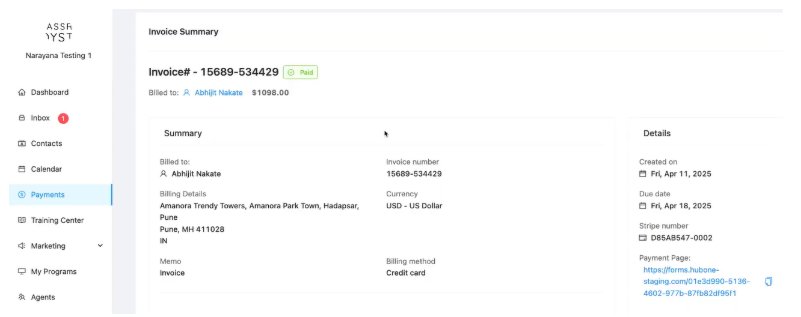
You can see a detailed summary of any invoice.
Open Invoice Summary:
From the "My Invoices" list, click on the Invoice Number of the invoice you want to view.

Review the Summary: This page provides a comprehensive, read-only view:
Invoice Header: Shows the Invoice Number, Status, Billed To contact, and total Amount.
Summary Section: Includes Billed To contact, Billing Address, Memo, Invoice Number, Currency, and Billing Method (e.g., Credit Card).
Line Items: Details each item/service, including Description, Quantity, Unit Price, and Amount. Also shows Subtotal, Discounts applied, Taxes (like GST), and the final Total / Amount Due.
Details Section: Shows Creation Date, Due Date, Stripe Number (if applicable), and the unique Payment Page link that customers use to pay. You can copy this link.
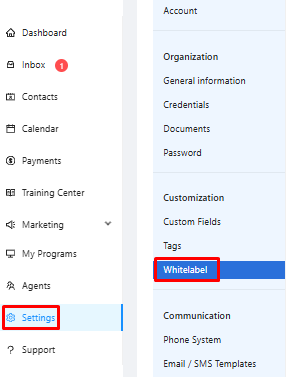
Navigate to White-Label Settings: Log in to your account, go to Setting sand select White-label:
You have two options for connecting a domain:
Purchase a New Domain: If you don't have a domain, you can click on Purchase a Domain, which will take you to the store where you can buy one.
Connect an Existing Domain: If you already own a domain, select Connect a Domain. Enter your parent domain (e.g., example.com) without any subdomains and click Connect Domain.
Once you connect your domain, you will see options to configure the subdomain for the invoices:
forms.yourcompany.com
A notification will appear stating that DNS Configuration is Required. You must configure your DNS records within 15 days, or the domain will be removed from your account:
View DNS Details: Click on Show Details to see the required DNS records.
Create CNAME Records: In your domain registrar's DNS management panel, create a CNAME record for each subdomain listed.
Point to Target DNS: Point each CNAME record to the corresponding target DNS provided in the DNS configuration details.
Verifying the Setup
Sync DNS Status: Back in the white-label settings, click on Sync DNS Status. This will check if your DNS changes have been successfully propagated.
Check the Status: The status next to each subdomain will change from Not Set to Live once the configuration is complete. This process may take a few minutes.
Test Your Custom Domain: To test the setup, open a browser and navigate to one of your new subdomains. You should see your custom page with your logo.
Customizing Your Invoice Design
Before creating invoices, you can set up how they look and what standard information they include.
Navigate to Invoice Design:
Click on Payments in the left-hand menu.
Click on the Invoice Design tab.
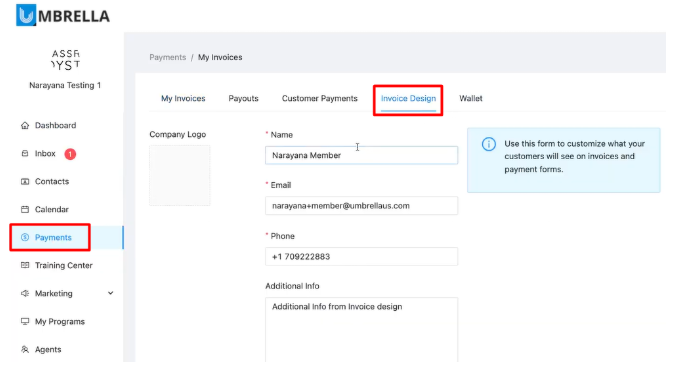
Customize Details:
Company Logo: Upload your business logo to appear on invoices.
Sender Information: Set the default Name, Email, and Phone number that will appear as the sender on the invoice.
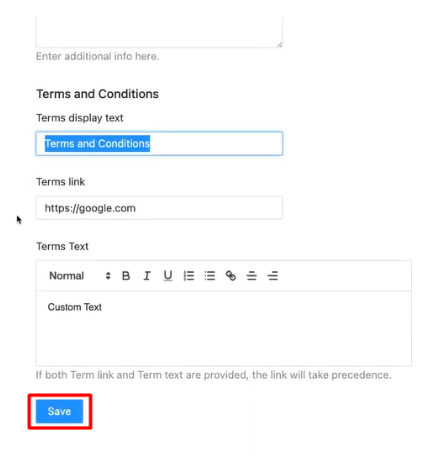
Additional Info: Add any standard text you want included on every invoice (e.g., payment instructions, company registration number).
Terms and Conditions: Define the display text (e.g., "Terms and Conditions"), provide a link to your full terms (optional), and/or write out specific terms directly in the text box. Customers may need to agree to these when paying.
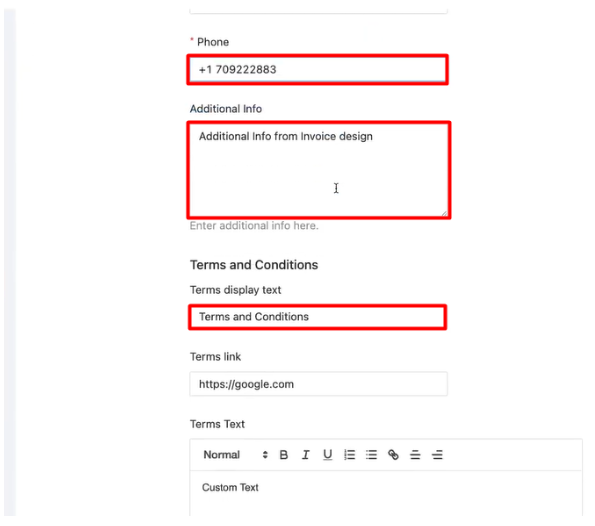
Save Your Design:
Click the Save button at the bottom of the form.